Thursday, January 31, 2013

Steam vs. bake - The sticky toffee pudding trials

Sticky toffee pudding, known in some countries as sticky date pudding, is another classic British comfort food like jam roly-poly that reminds me of school dinners (which is what we call school lunch in the North of England). It’s traditionally steamed in a pudding bowl, but is more like a cake than a pudding. Certainly it is more like a cake than Japanese プリン / pudding. Made with the dried fruit, nuts and wintery spices like cloves, served hot with a warm caramel toffee sauce poured over - it might look a bit inelegant but it’s shockingly good.


It isn't unusual for people to huddle possessively over their bowl until it’s finished. It was just such a reaction from a friend I had eventually made the pudding for that produced one of the first inklings that I might have a chance at making my little business idea work - She was so profoundly happy to taste it again after years living in Japan.

Though the pudding was traditionally steamed, most recipes you find today are for baking it. I was curious to see if there would be much difference to the end result between steaming and baking the sticky toffee pudding, and to see which would be better. If the steaming is good, I also thought to myself, then it means this is one traditional British dessert that can even be made in those Japanese kitchens that don't have an oven!

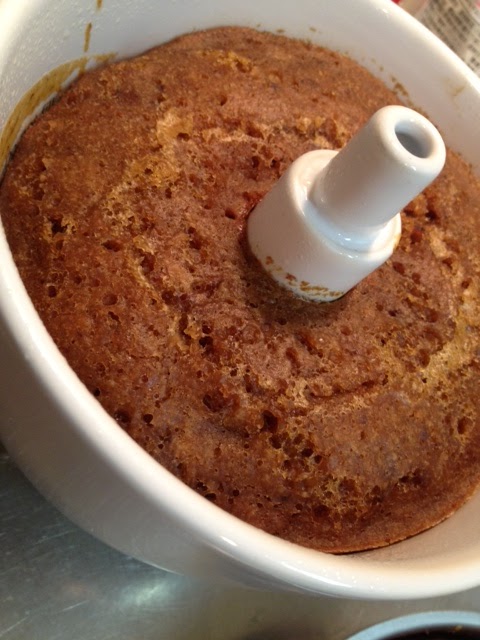
Sticky toffee pudding steamed in a pudding basin

The same sticky toffee pudding recipe baked in the oven

I used exactly the same recipe for each pudding, adapted from Felicity Cloake's in-depth investigations into some of the most well known versions.

This amount in the recipe made enough to divide between my 600ml pudding basin and a 14cm heart-shaped cake tin.
If you're only going to be baking then Felicity suggests a 24cm x 24cm square baking dish.
If you're only steaming then either do 2 smallish puddings in 500ml capacity basins or use one large 1-1.5 litre basin and adjust steaming times accordingly. If you don't have a pudding bowl any good solid, deep and heatproof bowl with a rim around the top to help keep the string in place will do.

Ingredients for the sponge:
  • 175g dates, stoned and barely chopped (I like chunks of date in the pudding)
  • 1 tsp bicarbonate of soda
  • 200ml boiling water
  • 100ml brandy (or just use 300ml boiling water/weak tea)
  • 50g unsalted butter, softened
  • 80g light brown sugar
  • 80g dark brown sugar
  • 2 eggs, beaten
  • 1/2 tsp vanilla essence
  • 175g plain flour
  • 1 tsp baking powder
  • 1/2 tsp ground cloves
  • 1/2 tsp cinnamon
  • 75g walnuts
  • Pinch of salt
Ingredients for the sauce:
  • 115g unsalted butter
  • 75g caster sugar
  • 40g dark brown sugar
  • 140ml double cream
  • Pinch of salt

Method (if baking):
  1. Pre-heat the oven to 180°C and roast the walnuts for 5-10 minutes. Butter your baking dish.
  2. Make the sauce by putting all the ingredients into a pan with a pinch of salt and heating slowly until the butter has melted, then turn up the heat and bring to the boil. Boil for about 4 minutes, until the sauce has thickened enough to coat the back of a spoon. Pour up to half the sauce into the base of the dish and then put it in the freezer while you make the batter.
  3. Put the dates and bicarbonate of soda in a heatproof dish, pour over the boiling water and add the brandy if using. Leave to soften while you make the batter.
  4. Beat together the butter, sugar and salt with a hand mixer until fluffy. Add vanilla essence to the eggs and beat them into the mixture a little at a time. In other bowl sift together the flour, baking powder and spices and then fold these into the mixture until just combined. Add the dates with their soaking liquid and the walnuts, and mix well. The batter will be a little looser than regular cake batter.
  5. Take the dish out of the freezer and pour the batter on top of the toffee sauce. Bake for 30 minutes, until a skewer inserted into the cake part comes out clean (though remember you might get some of the sauce on the end of the skewer).
  6. When the pudding is ready turn it out onto a dish to serve. Serve with a jug of warmed sauce for pouring, or poke a few holes in the sponge and pour over the rest of the sauce. Serve in bowls as it is, or with ice cream or custard. Alternatively you can let it cool down and reheat it and the sauce in the microwave if you're not serving it immediately.


Method (if steaming):
  1. Prepare a large pan of water for steaming and a buttered pudding basin. If your basin doesn't have its own lid watch this video to see how to make one from foil and buttered parchment.
  2. Roast the walnuts for 5-10 minutes in an 180°C oven - optional, turning the oven on just for this part feels a bit wasteful, but gently roasted nuts do add a nicer flavour than raw nuts.
  3. Put the dates and bicarbonate of soda in a heatproof dish, pour over the boiling water and add the brandy if using. Leave to soften while you make the batter.
  4. Beat together the butter, sugar and salt with a hand mixer until fluffy. Add vanilla essence to the eggs and beat them into the mixture a little at a time. In other bowl sift together the flour, baking powder and spices and then fold these into the mixture until just combined. Add the dates with their soaking liquid and the walnuts, and mix well. The batter will be a little looser than regular cake batter.
  5. Pour the batter into your buttered basin up to about halfway (or as your basin indicates), to give the pudding room to rise. Seal the basin with its lid, or prepared pleated foil and parchment (as described in the video above). Tie the string to make a handle for removing the hot basin later and lower into the pan of simmering water, onto something like an upturned saucer - see photo above. Make sure there is 1cm or so clear between the inside of the pan and the basin and that the hot water comes up to about halfway up the outside of the basin (or as your basin indicates). Cover the pan with a lid, or foil and steam until a skewer inserted comes out clean.
  6. My pudding basin is medium sized at 600ml and it has a hole through the middle like a bundt cake, to help steam quickly and so my pudding was ready in about 45 minutes. If you are using a traditional pudding basin without a hole and/or if you are making a larger pudding then steaming may take 1-2 hours. You might also need to top up the boiling water during the steaming time, keep an eye on it to make sure the water stays high enough to cook the pudding and that you don't boil dry.
  7. Make the sauce by putting all the ingredients into a pan with a pinch of salt and heating slowly until the butter has melted, then turn up the heat and bring to the boil. Boil for about 4 minutes, until the sauce has thickened enough to coat the back of a spoon.
  8. When the pudding is ready turn it out onto a dish to serve. Poke a few holes in the sponge and pour over the sauce. Serve in bowls as it is, or with ice cream or custard. Alternatively you can let it cool down and reheat it and the sauce in the microwave if you're not serving it immediately.


The verdict - (Steamed pudding in the first photo, baked one in the second)

The steamed pudding won. It won so majorly that I barely had time to take this photo of the last piece in the bowl at the party I took it to :) Hurrah! Although the baked version was quicker and also delicious, the steamed pudding was fluffier and remarkably moist. The oven-baked pudding was more intensely sweet all-over perhaps because of the sauce baked into the base, whereas the steamed pudding had more variety in tastes and texture. The baked pudding had a closer crumb, where the steamed pudding was open and springy.

Perhaps next time I'll try putting some sauce in the base of the steamed pudding basin - I was afraid I wouldn't be able to get it out of the steaming mould... I've also seen interesting things along the lines of tarte-tatin with caramelised apples or pears in the base of the pudding. More comfort food experiments ahead to keep us warm in the Tokyo winter months!


Thursday, January 10, 2013

Update on the sourdough journey

I made a few discoveries over the past year or so experimenting with sourdough recipes in my home oven and thought I'd post a quick update on progress made since my initial somewhat anemic looking loaves.


The most important thing I've learned in this time has been the importance of getting a really high temperature to achieve an appealing red-brown crust. Some of the recipes I've used recommend putting the bread in a cool oven, but I have found that in my oven this generally results in the pale crust seen in my earlier posts.

I'll now generally pre-heat the oven as high as it goes and reduce the heat during the cooking time. At home my small electric oven's highest temperature is 250°C and it has a stone floor under which is a second heating element that can be used to give a kick of heat from below. Although I find the loaves blacken on the base if baked directly on that stone, using the lower heat source with the loaf on a baking tray on its regular shelf has given me the best results.

Most ovens won't have an in-built stone, so you can try pre-heating your oven with an unglazed quarry tile or pizza stone in it to get a similar effect. You'll have to experiment to see if baking directly on that stone works best in your oven or if like me you just use it as a radiating heat source below your tray.

Having a better feel now for when the dough is sufficiently proved has also helped improve the crust colour of my loaves. Recipes I've followed call for an 8-12 hour proving time at around 21°C, but I find this is often too long and results in an exhausted dough with low oven spring and a pale crust.

I've heard that this is due to a younger dough having more sugars from the wheat flour remaining to be used in the Maillard reaction though am not entirely sure if this is accurate. Dan Lepard recommends keeping the final proof in particular on the conservative side with the idea that you'll get a better oven spring.


The final tip is on something I'm still working on and starting to see the importance of – the folding and shaping of the dough. Practice this if you are looking to get a nice bounced spring to your loaf with a rounded base that lifts itself up from the baking sheet when baked and is easy to slash with a lame before baking.

There are many methods to try but they all arrange the dough, through a couple of steps with short rests, into a tighter package than it would have been in had you simply let the dough rise after kneading, tipped the proved dough onto a surface and formed your loaf shape there and then.

For free-standing loaves Dan Lepard has us making a package of the dough during the initial rising time, with what he calls a blanket fold. Dan posts a description of one blanket fold here, and there are variations such as repeating the same fold a few times during the initial rise or performing a double blanket fold in which you blanket fold, quarter-turn the dough and blanket fold again at each step.

On this journey so far I've also tried out all sorts of recipes from Ed Wood's Classic Sourdoughs recipe book including Christmas stollen with marzipan, soft pretzels, hamburger buns, waffles and Ramadan sweet breads. I can heartily recommend the book as a good solid way to get started and be amazed at the huge variety of things you can make at home from your simple starter.


In my own recipe experiments, I adapted a basic white sourdough recipe to include kombu! The idea came from reading about the glutamic acid that is responsible for umami in kombu also being in sourdough, and I wondered if adding the seaweed might produce a really tasty loaf that would be particularly good with other foods. (Interestingly, or so I thought, you'll find kombu in the ingredients list of many packets of salted crisps in Japan. Though it might not be marketed on the front of the pack it is used to improve the flavor.)

Super-umami! Kombu sourdough loaves

I added some roughly chopped shio-kombu to my dough mix before kneading, cutting back on the salt since there is so much salt on the kombu already. The shio-kombu I used contained soy sauce as well, and I found that using just about a teaspoon of it in a 680g loaf produced enough of a kombu accent without the soy sauce flavour taking over.

I plan to make more kombu sourdough loaves to photograph the crumb and write a separate post about it with a recipe.

Wednesday, January 2, 2013

Field Trip! - Cakes and cafes in England

series of posts from visiting interesting little (and large) cafes, food-related establishments and other places of inspiration.

I sampled a few cakes and sweets over the Christmas holidays in the UK. Here are some of the establishments I came across, from the trendy to the traditional.


London sweets trends included big dollops of fruit-flavoured meringue, and salted caramel everything – shortbread, chocolates, toffees. For display, huge plates, cake stands galore and piling up into pyramids were employed more often than refrigeration units.

Ottolenghi in Islington was very cool, and busy, with the communal table in the restaurant area full. The cash register was hidden behind mounds of meringue and cookies and made for a bit of a hectic time for the staff with people ogling food and queuing to pay in the same standing space. Breakfast here is supposed to be good, though we couldn't fight through the crowds.


Nipping into Curzon Soho cinema for a matinee I noticed for the first time that the café (photos below) is catered by the very trendy Konditor and Cook who are currently showing off their mince pies, voted best in Britain by the Telegraph.


Up North things were a bit more old fashioned, with neon-lit chilled glass cabinets more common than in London cafes. Here, as modeled by the Odeon cinema in Manchester's Printworks is how we're familiar seeing our cakes presented, somewhat folornly strip-lit.


Also in the north I visited a small deli café called All Things Nice in Marple that has a formidable cheese counter along with bakery goods, hams, pies and cakes. They have a small cafe seating area at the back of the shop, and do events like wine and cheese tasting.


Finally I wanted to share with you this magnificent dessert trolley as wheeled out at the end of a festive meal in Chester's restaurant in Macclesfield. Complete with wobbly wheels and a slide-out shelf for plating the desserts, this very British piece of restaurant furniture was piled with cheese cake, apple pie, pavlova, carrot cakes, lemon meringue, chocolate cake, trifle, and strawberries. Everything doused in cream on request.


Tuesday, January 1, 2013

Flour tests – Shipton Mill, British flours

While I was in England over the Christmas holidays I took the opportunity to try out some flour from Shipton Mill in Gloucestershire.


There has been a mill on the site of the restored Shipton Mill since at least the 11th Century when it was recorded in the Domesday book. The current owners discovered the mill in 1981 and though it doesn't currently drive the mill stones the wheel does turn and the site can be visited Monday to Friday and Saturday mornings.

At their old mill site and from a larger modern plant they mill a large variety of wheats and specialty grains that are sourced locally and from abroad, and include traditionally stone-ground wholemeal flour. Their activities include promoting the cultivation of rare and old varieties of wheat for benefits to culture, nutrition and heritage rather than being driven only by commercial interest.


When I arrived at my sister's house the package I'd ordered online from their store was already waiting for me. Look how nicely presented it was, it'd make a nice gift for any experimenting bread makers you might know in the UK :)

I ordered their white bread flour made from UK wheat, some stone-milled whole wheat flour, their seed mix containing oats, sunflower seeds, wheat and barley flakes and millet, and a rectangular banneton, since these are quite expensive in Japan.

I wish we had flour like this in Japan! To be fair, I've only used regular Japanese supermarket bread flour so far and so perhaps shouldn't compare yet, but working with flour from Shipton Mill for the first time was a real pleasure. My starter seemed to love it too, being particularly bubbly during culture proof and springy during kneading. The crumb of my basic sourdough loaf was pleasingly off-white and flavoursome, and it toasted marvelously when used for cheese and tuna melts.


I also made a wholewheat loaf with a few handfuls of seed mix folded in during the punching down and shaping stage. This was made to be eaten toasted Christmas morning with the peppered mackerel I had been craving, poached eggs and mugs of tea amongst the torn wrapping paper and excited children. I've stashed the remains of the seed mix in my suitcase for further experimenting back in Japan. I decided against trying to carry packages of white flour in my luggage for obvious reasons ;)


Having a little pretzel dough left over from another Shipton Mill flour experiment, my nephew inspired me to have a go at making one of his favourite snacks, breadsticks. Not having a proper recipe to hand we just rolled them out and let them proof slightly on their baking tray before brushing with a little olive oil and baking in the pre-heating oven until they coloured (about 25 minutes). They got his seal of approval and were fun and quick to make. For more grown-up variations you could roll them in sesame seeds or poppy seeds, sprinkle with rock salt and even pepper.